
Datasets documentation
目标检测
You are viewing main version, which requires installation from source. If you'd like
regular pip install, checkout the latest stable version (v4.8.4).
目标检测
目标检测模型用于识别图像中的物体,目标检测数据集则应用于自动驾驶以及检测野火等自然灾害等场景。本指南将展示如何按照来自 Albumentations 的 教程,对目标检测数据集应用变换。
要运行这些示例,请确保已安装最新版本的 albumentations 和 cv2:
pip install -U albumentations opencv-python
在此示例中,您将使用 cppe-5 数据集,在 COVID-19 大流行的背景下识别医疗个人防护装备(PPE)。
加载数据集并查看一个示例:
>>> from datasets import load_dataset

>>> ds = load_dataset("rishitdagli/cppe-5")
>>> example = ds['train'][0]
>>> example
{'height': 663,
 'image': <PIL.JpegImagePlugin.JpegImageFile image mode=RGB size=943x663 at 0x7FC3DC756250>,
 'image_id': 15,
 'objects': {'area': [3796, 1596, 152768, 81002],
  'bbox': [[302.0, 109.0, 73.0, 52.0],
   [810.0, 100.0, 57.0, 28.0],
   [160.0, 31.0, 248.0, 616.0],
   [741.0, 68.0, 202.0, 401.0]],
  'category': [4, 4, 0, 0],
  'id': [114, 115, 116, 117]},
 'width': 943}
该数据集包含以下字段:
image:包含图像的 PIL.Image.Image 对象。image_id:图像 ID。height:图像的高度。width:图像的宽度。objects: 一个包含图像中对象边界框元数据的字典:id:标注 ID。area:边界框的面积。bbox:对象的边界框(采用 coco 格式)。category:该对象的类别,可能的取值包括Coverall (0)、Face_Shield (1)、Gloves (2)、Goggles (3)和Mask (4)。
你可以使用一些内部的 torch 工具在图像上可视化 bboxes。为此,你需要引用与类别 ID 关联的 ClassLabel 特征,以便查找字符串标签:
>>> import torch
>>> from torchvision.ops import box_convert
>>> from torchvision.utils import draw_bounding_boxes
>>> from torchvision.transforms.functional import pil_to_tensor, to_pil_image

>>> categories = ds['train'].features['objects'].feature['category']

>>> boxes_xywh = torch.tensor(example['objects']['bbox'])
>>> boxes_xyxy = box_convert(boxes_xywh, 'xywh', 'xyxy')
>>> labels = [categories.int2str(x) for x in example['objects']['category']]
>>> to_pil_image(
...     draw_bounding_boxes(
...         pil_to_tensor(example['image']),
...         boxes_xyxy,
...         colors="red",
...         labels=labels,
...     )
... )
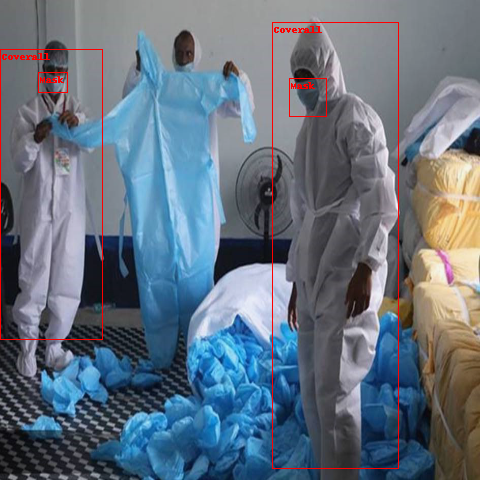
使用 albumentations,你可以应用会影响图像的变换,同时相应地更新 bboxes。在这种情况下,图像会被调整为 (480, 480)、水平翻转并提亮。
>>> import albumentations
>>> import numpy as np

>>> transform = albumentations.Compose([
...     albumentations.Resize(480, 480),
...     albumentations.HorizontalFlip(p=1.0),
...     albumentations.RandomBrightnessContrast(p=1.0),
... ], bbox_params=albumentations.BboxParams(format='coco',  label_fields=['category']))

>>> image = np.array(example['image'])
>>> out = transform(
...     image=image,
...     bboxes=example['objects']['bbox'],
...     category=example['objects']['category'],
... )现在当你可视化结果时,图像应该被翻转,但bboxes仍然应该位于正确的位置。
>>> image = torch.tensor(out['image']).permute(2, 0, 1)
>>> boxes_xywh = torch.stack([torch.tensor(x) for x in out['bboxes']])
>>> boxes_xyxy = box_convert(boxes_xywh, 'xywh', 'xyxy')
>>> labels = [categories.int2str(x) for x in out['category']]
>>> to_pil_image(
...     draw_bounding_boxes(
...         image,
...         boxes_xyxy,
...         colors='red',
...         labels=labels
...     )
... )
创建一个函数,将转换应用于一批示例:
>>> def transforms(examples):
...     images, bboxes, categories = [], [], []
...     for image, objects in zip(examples['image'], examples['objects']):
...         image = np.array(image.convert("RGB"))
...         out = transform(
...             image=image,
...             bboxes=objects['bbox'],
...             category=objects['category']
...         )
...         images.append(torch.tensor(out['image']).permute(2, 0, 1))
...         bboxes.append(torch.tensor(out['bboxes']))
...         categories.append(out['category'])
...     return {'image': images, 'bbox': bboxes, 'category': categories}
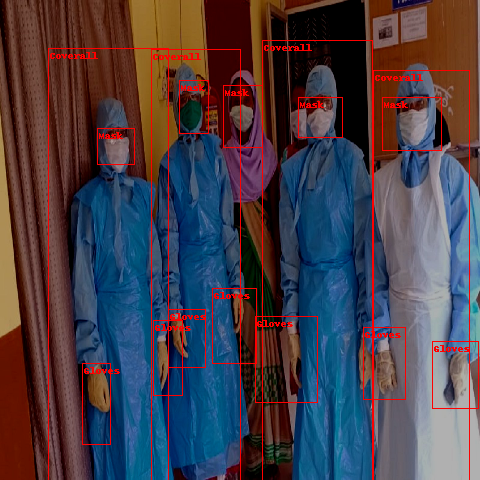
使用 set_transform() 函数可以即时应用转换,从而减少磁盘空间占用。数据增强中的随机性可能导致两次访问同一示例时返回不同的图像。这在训练模型多个 epoch 时尤为有用。
>>> ds['train'].set_transform(transforms)你可以通过可视化第 10 个示例来验证该转换是否正常工作:
>>> example = ds['train'][10]
>>> to_pil_image(
...     draw_bounding_boxes(
...         example['image'],
...         box_convert(example['bbox'], 'xywh', 'xyxy'),
...         colors='red',
...         labels=[categories.int2str(x) for x in example['category']]
...     )
... )
Update on GitHub现在你已经了解了如何为对象检测处理数据集,接下来学习如何训练对象检测模型并使用它进行推理。